
How to ... DJ Pro
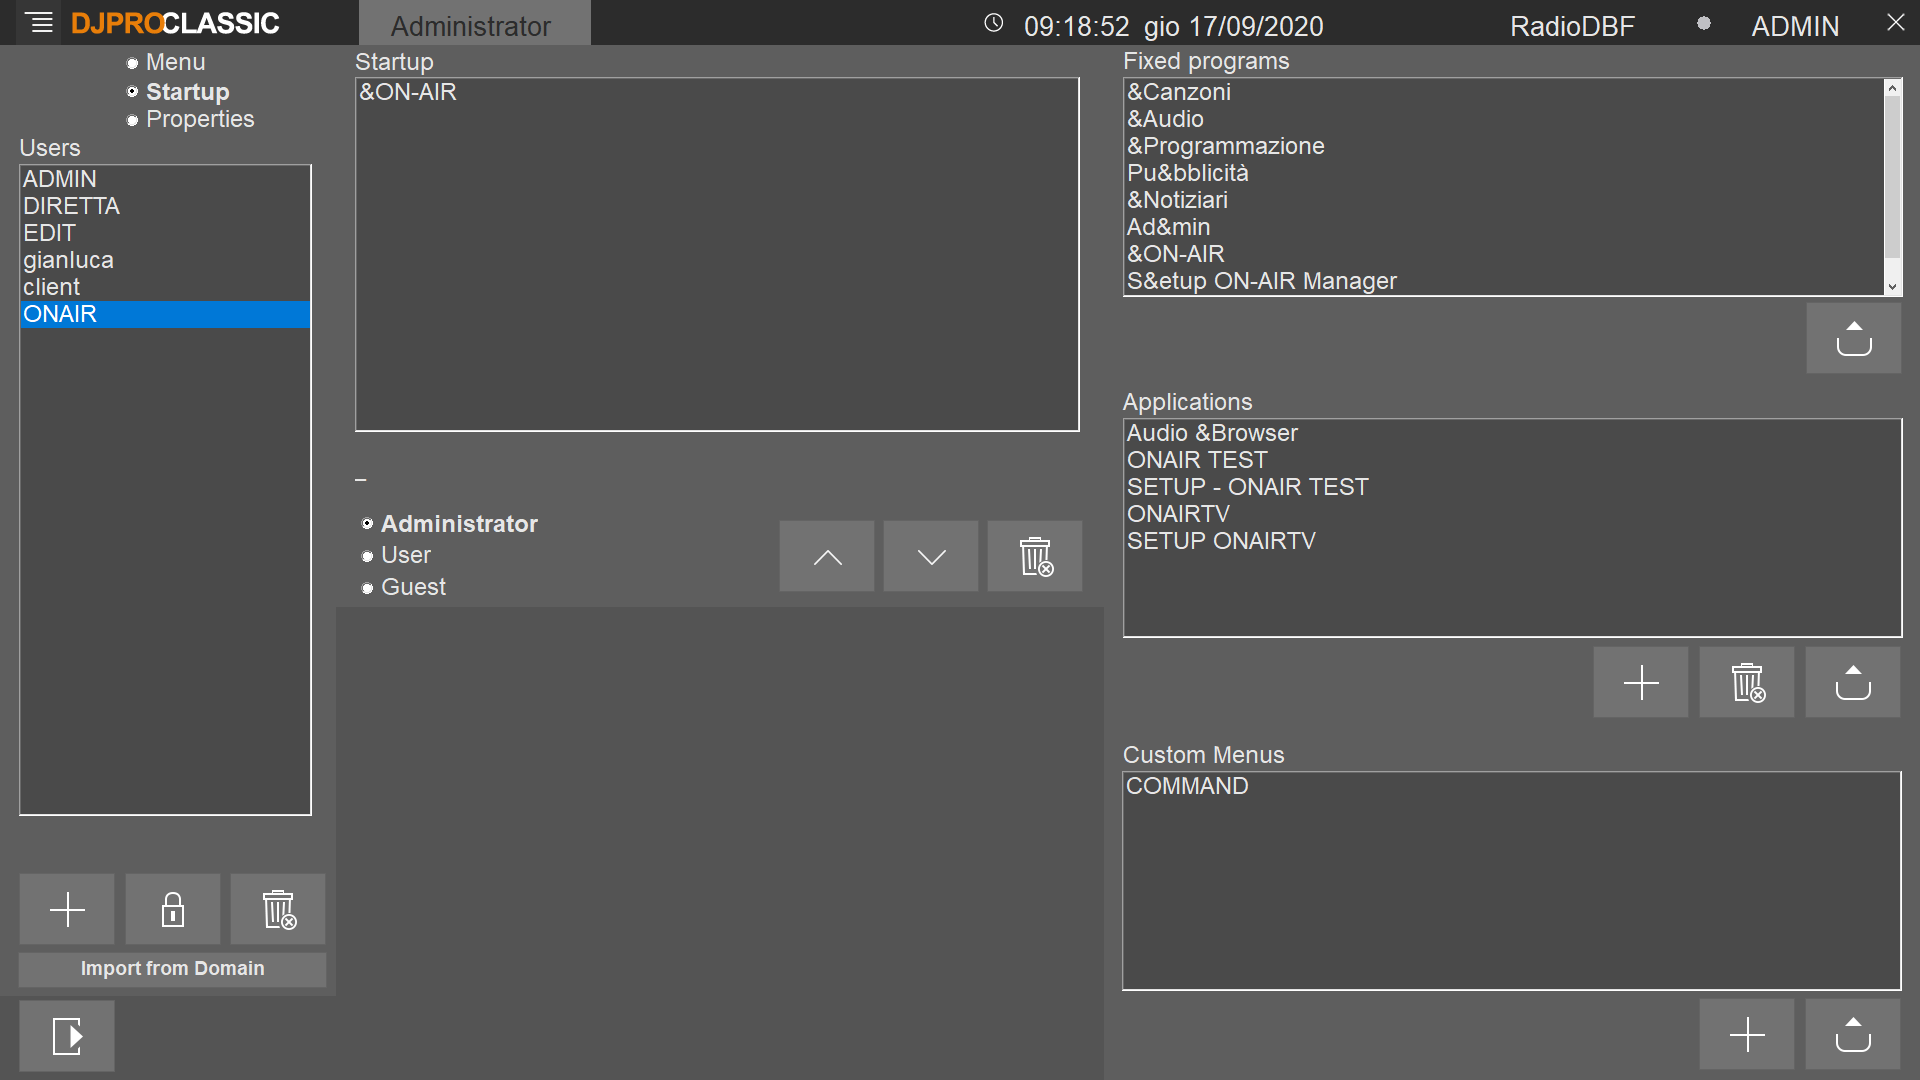
If you want to run automatically the ONAIR playout at Windows startup, follow the steps below.Create a New User to run the OnAir automaticallyAccess DjPro with ADMIN user and open the Administrator Tools, then User Manager. Create a New User with the “+” button (for example, ONAIR), and, in the Main Menu, drag&drop “-->ON-AIR” and “-->Setup ON-AIR Manager” from the Fixed programs box. Then, in the Startup Menu, insert only the “-->ON-AIR” fixed program.
Create a link to run the OnAirMake a copy of Dj-Pro’s link you already have onto the desktop and rename it (for example: ONAIR), then right click on it and select “Properties”. In the “Destination” field, write the string, composed by the path of Menu.exe, the path of the executable files of your radio and the name of the user you previously created. All the string must be into quotes.Here below an example of the final string:“C:\Program Files\DJPRO\BIN\Menu.EXE M:\RADIO\BIN\WINDOWS ONAIR”Put the link in Windows StartupCopy the new link and paste it into Windows Startup folder:C:\Users\[your Windows user]\AppData\Roaming\Microsoft\Windows\Start Menu\Programs\Startup.Warning: it may happen that your machine is too fast in restarting Windows, so that the ONAIR playout will start before the access to the network is fully initialized: the result is that ONAIR will stop loading, with an error like “Path not found: M:\RADIO\BIN\WINDOWS”.In this case it is necessary to install a software which can delay the application start and insert its link into Windows Startup Folder.
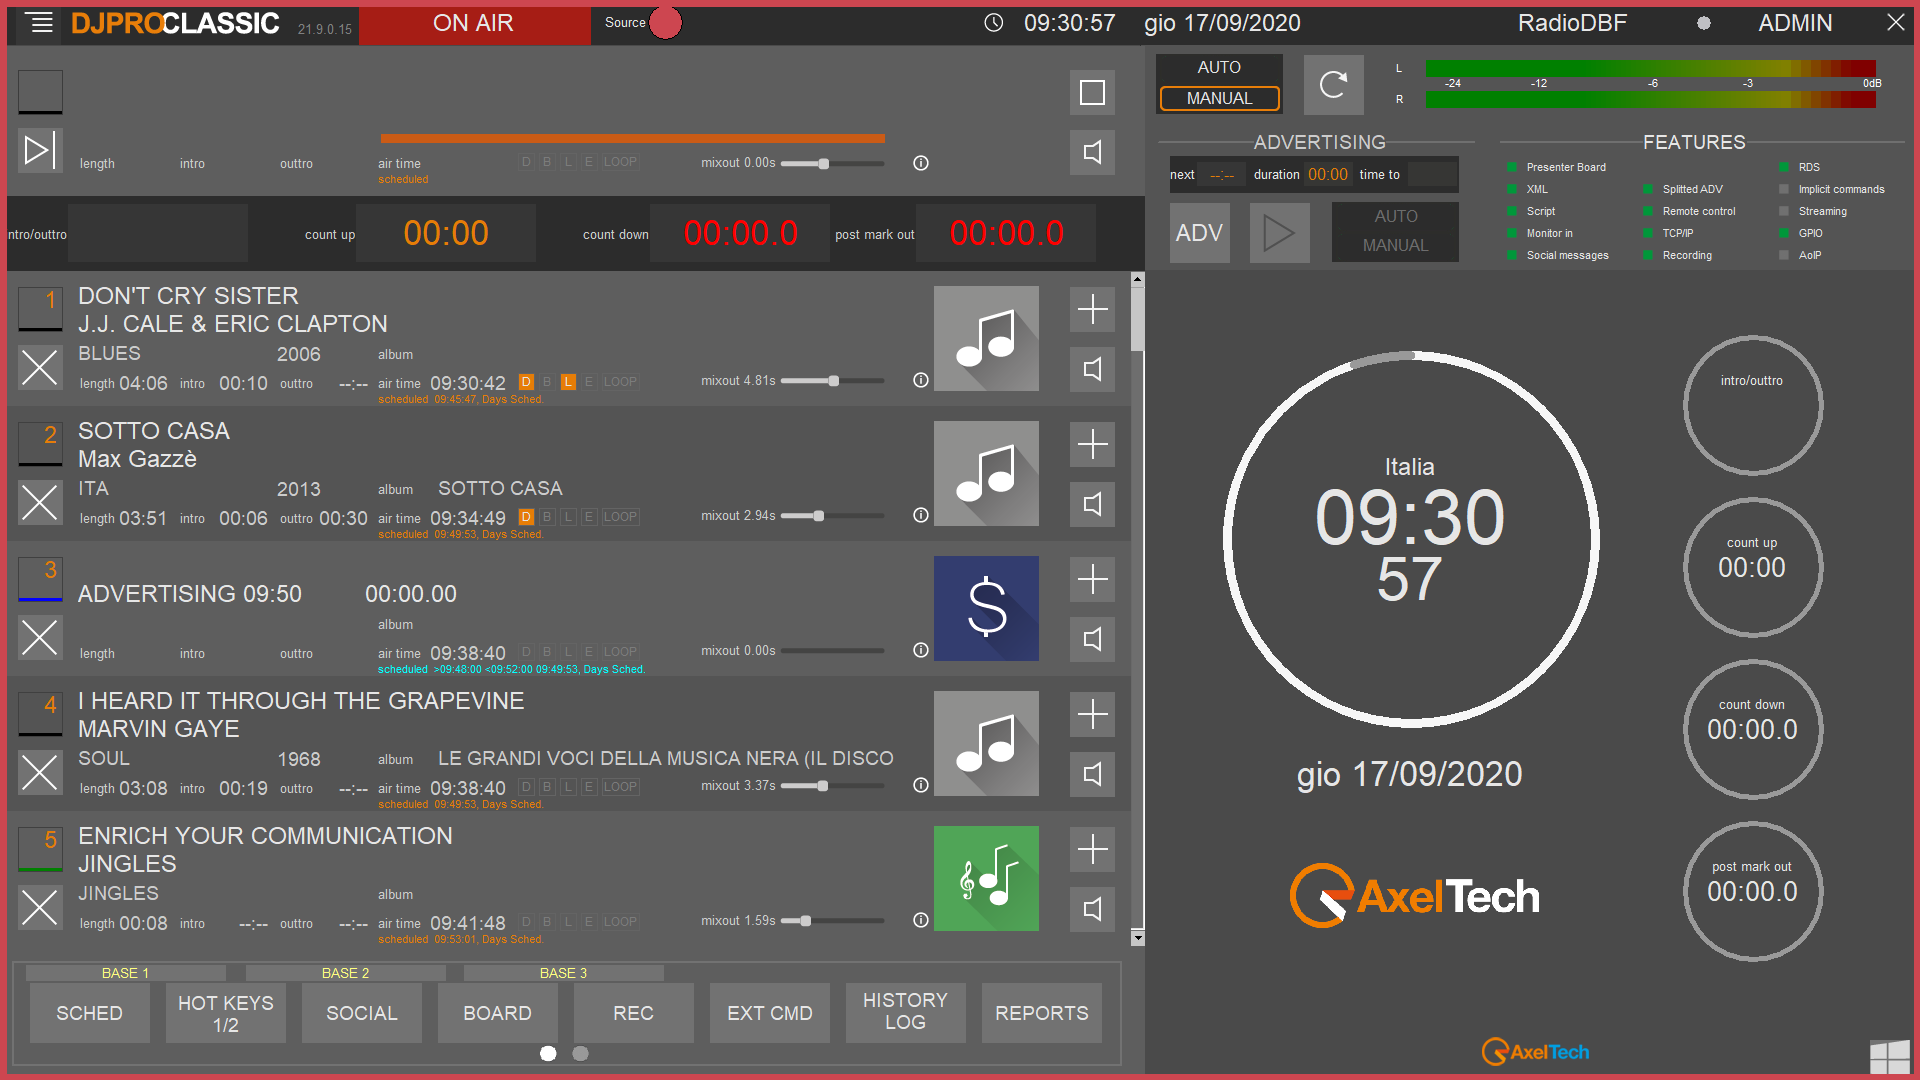
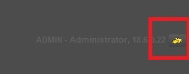
What is disk auto-change?In system that has a Main Server and one or more backup servers, each DjPro workstation can continuously check the mapped drives associated to these servers (sources) according to a priority list order. If the first source in the list is available, DjPro uses this one as the Main Server. If a problem occurs on the communication with the Main Server, DjPro automatically switches to the second source in the list. Again, if the second source has a problem too, it will switch on the third source, and so on, up to the last source that usually is a local drive on the workstation.This job is operated by the menu.exe process, that means DjPro main menu must be always open if you want this feature to be operative. All the checks are performed in background, they don’t affect the normal operations done by the user.How does it work?DjPro’s menu constantly checks the access to the mapped drives (usually, the M: drive). In case of Main Server failure, switch breakdown or a general fail situation, if DjPro recognizes the mapped drives are no longer available, it automatically uses some DOS commands for unmapping the drives from the first source and maps them to the next available one.How can the user notice that the main server is down?When DjPro is mapped to the Main Server, the “Source” circle that you find on the top bar is grey colored. When DjPro is mapped on another source, the “Source” circle changes its color, and a frame of the same color surrounds the screen.In the Enterprise version, the “Source” circle is not present, only the colored frame will show you the source is changed.Colors for the sources are set by default, but they can be customized.
What to do after DjPro has mapped on a secondary source?When a fault happens, not due to human error, the only way to bring back the Radio station to the normal activity is to check the system and solve the issue. Generally it could be necessary an IT Technician to find the issue and fix it.Once normal operation has been restored, after a reverse data backup from the secondary source to the Main Server and when you are ready to switch back DjPro workstation to the Main Server, go to the main menu, click on the folder icon that you find on the bottom right of the screen to make the list of all the available sources appear (in the Enterprise version, the fourth button on the bottom left), then double click on the item related to the Main Server to unmap the drives from the backup source and map them back to the main source. After this operation, the “Source” circle on top of the screen should turn grey and the frame around the screen should disappear.If the data of the Main Server and the backup server are synchronized, you can do the switch back from the where the OnAir PC playout is open and playing, it should not affect the operations since it is a real-time switch.Warning: DjPro does not automatically switch back to Main Server once it switches to another source. The switch back must be done manually, using the method mentioned above.
How to keep the backup servers up to date?In order to always keep the backup servers updated, you can use professional sync softwares, such as InSync or ViceVersa, that allow to schedule a daily backup from the Main Server to the backup sources.Ok, I want to configure my DjPro with disk auto-changeAccess to Dj PRO with the ADMIN user, and open the Administrator Tools.In the Administrator Tools menu, click on “Setup workstation” and select “Settings 2” in the upper Left side of the screen.
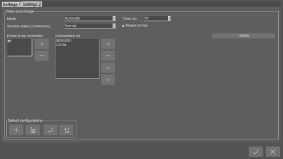
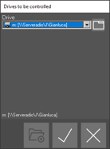
Parameters to be set:MODE: AutomaticTIMER (s): 10Configure a Source:Press + in the “Drives to be Controlled” section. Select the Drive to control (usually it is M:\) and confirm.
Now press + in the “Connections List” side, where it is possible to configure all the available Sources. In the window that appears you need to insert the parameters for the connection of the new source. In the picture below, an example for these parameters:
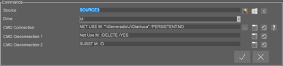
How to set the commands:In CMD Connection you have to insert the command string for the connection. The command type can be “NET USE” or “SUBST”, depending on the type of connection you need: Net Use is for mapping a Network drive, while Subst is for associating a drive letter to a local folder.For a help the user can press the ? button on the left side, and a quick guide on the commands appear:
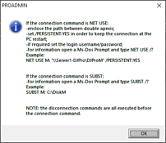
Anyway, you can automatically set the commands using the “…” icon to browse the network or the local drives and directly select the folder.CMD Disconnection 1 and CMD Disconnection 2 are automatically set, but in case you need to insert them again, click on the round arrow icon and they will appear in the related fields. This two default Commands are needed for unmapping the source before mapping it with the command set in CMD Connection.Press the OK button to save changes and close the windowFollow the same steps to add all the other Sources for the Radio Station.TIP: If you want, you can save the auto-change parameters into an .ACT file that you can use, for example, to load the same setup on another DjPro Client. You can find, in the “Default Configurations” section, the options for creating a new setup, loading an .ACT file and saving the current settings into an .ACT file.When you install DjPro, you are also provided with some sample .ACT files that you can load from M:\RADIO\BIN\WINDOWS folder.Warning: the disk auto-change feature must be set for each DjPro Client, so the parameters must be configured in each workstation where you want to use it.
Here below a list of recommendations to keep your DjPro system working in the best way:Electrical system with stable current voltageUnstable power supply can cause malfunctioning on the system, such as PCs not switching on, USB ports not working, corruption of databases in case of sudden power failure. Always keep your electrical system under control.Avoid excessive loads on the Radio LANYour Radio system must have a 1Gb LAN, so that the communication among the devices in the network is very fast and ensures you a smooth audio stream with no interruptions. Anyway, the more computers you add to the network, the more traffic is generated, and this could compromise your workflow and, in a special way, the playout performance. The suggestion is to keep the DjPro PCs in a separate network from the other machines, and you can set a PC with a double network card that can be used as a bridge between the DjPro network and the rest of the other machines of your Radio system.Dedicated internet connectionSame reason as the previous point. Moreover, try to assign Internet connection only to the PCs that really need it, in order to limit traffic jam and possible viruses and malwares coming from the net.Constantly ensure that the data backup is up to dateYour DjPro system can be configured in a way to automatically execute backup copies of the Radio data from the Main Server to several backup servers, using a dedicated software such as ViceVersa, and to automatically switch from the main source to a backup source in case of failure (“disaster recovery”). Thus, it is very important that, periodically, you check that your backups are up to date.Do not use the Server to store data that do not concern the RadioEven if your system is provided with a very big storage and it will take years and years before you can fill it, this does not mean you can use the Server of the Radio to save personal audio files and documents. Save the external data on your personal computer and import on the Server ONLY the files used for the Radio. This is important to keep your system always clean and ordered.Import only high quality audio files in a specific formatThis means that you should avoid to import poor quality audio files, or “dirty” audio files with a lot of metadata inside (in this case you can use a software such as Adobe Audition to clean them before the import). In particular, avoid importing MP3 audio files with variable bitrate (VBR) because the OnAir playout cannot manage them correctly, you must convert them with constant bitrate (CBR).Normalize the audio filesIf you will normalize all the imported audio files, you will make them as close as possible to the same volume level, then your audio processor does not need to work too much to adjust the final audio output.Keep the audio categories of DjPro as clean as possibleDo not overload the song database and all the other audio databases with a big amount of data that you are not going to use. This can slow down the operations inside the databases and can create problems to the OnAir playout when manually selecting audio in a category.Inquire carefully before changing the parameters of any software or deviceYou are usually provided with all the manuals for the software and the devices that are present in your Radio system, so you can consult them in order to see what you can do with any software and device or when you do not remember a particular functionality. Anyway, it will take some time before you will get used to the whole system, so, especially in the first period, when you want to change the behavior of a software or device and you have any doubts on how to do it, just contact our technical support, we will help you in setting the system according to your needs.Practice!This point is strictly connected to the previous one. The fastest way to get confident with the new system is to constantly work on it, by continuously repeating the same actions and experiencing new features that can help you in achieving the results you want.
Voice-Overs are a special audio category of DjPro: with the On-Air in Automatic mode a Voice-Over can play between two other audio, overlapping to them. With this method, for example, you can pre-record the voice of a speaker, schedule it as a Voice-Over and play it on the air, thus simulating a live speech over the intro of a song.The behavior of Voice-Overs on the air depends on several parameters, which must be set on the Voice-Overs section in the ON-AIR Setup.MAIN PARAMETERSHere below a list of the most important parameters that you find in the OnAir Setup, Voice-Overs section.Voice-over volumeIt indicates the Voice-Over volume level, the possible values are integers from 0 to 50 where 0=0dB, 1=-1dB, 2=-2dB, etc. The default value is 0 (maximum volume).OUT song volumeIf the Voice-Over is placed between two tracks, it indicates the lowering of the first track volume level when the Voice-Over is playing. The possible values are integers from 0 to 50 where 0=0dB, 1=-1dB, 2=-2dB, etc. The default value is 10IN song volumeIf the Voice-Over is placed between two tracks, it indicates the lowering of the second track volume level when the Voice-Over is playing. The possible values are integers from 0 to 50 where 0=0dB, 1=-1dB, 2=-2dB, etc. The default value is 10.Disk OUT ramp(s)Value, in seconds, of the mix slope for the Voice-Over opening. It is the fade duration of the first track from its normal volume level to the one set in OUT song volume when the Voice-Over starts. Possible values range from 0 to 20, the default is 0.Disk IN ramp(s)Value, in seconds, of the mix slope for the Voice-Over closing. It is the fade duration of the second track from IN song volume level to its normal volume level when the Voice-Over ends. Possible values range from 0 to 20, the default is 0.Time of anticipated end of VOYou can set this parameter if you want to anticipate the Disk IN ramp. The value is in seconds, the default is 0.PRE END baseSeconds to reduce the duration of the background base in order to improve the transition between VOICE-OVER and BASE + NEXT TRACK, we recommend a value equal or close to Time of anticipated end of VO. The default value is 0.Voice-over typeIt is the most important parameter; the behavior of the Voice-Overs on the air varies depending on its value. By setting this parameter, you choose the type for all the scheduled Voice-Overs. The default value is 0.In the next chapter, we will explain the different types of Voice-Overs.Voice-over type from archiveSelect this parameter if you want to choose the type for each scheduled Voice-Over; it automatically disables the Voice-over typeparameter, and you will set the type of each Voice-Over during the scheduling process.If you modify one or more of the above mentioned parameters during the playout, you must press the [UPD] button in the OnAir interface in order to make the changes immediately available.VOICE-OVER TYPESStarting now, for the rest of the document:
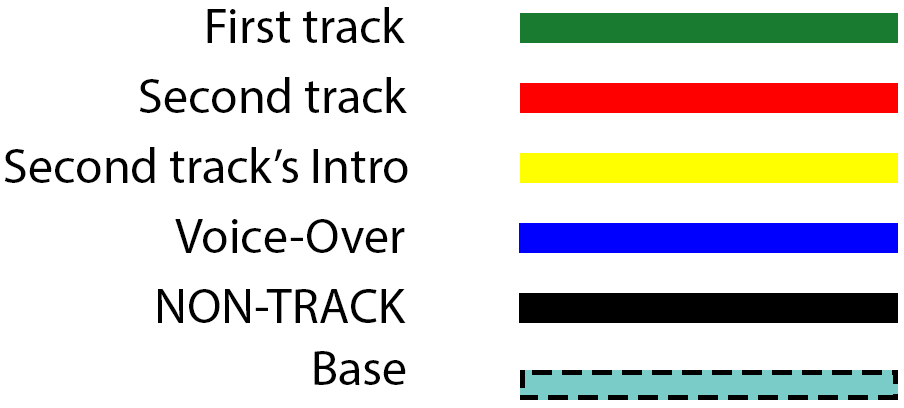
There are four different types of Voice-Overs, each one with a different behavior:VOICE-OVER TYPE 0 – END ALWAYS ON THE INTRO


When the Voice-Over is between a NON-TRACK and a TRACK, the Voice-Over is played completely on the second track (if its duration is higher than the intro, the Voice-Over will cover the vocals)

ATTENTION: if the AUTOMATIC ADVERTISING is ready at the end of the first track, the Voice-Over could finish over the advertising. In order to avoid this behavior, you can enable the parameter called No transmission of advertisement after a Voice-over from the OnAir Setup. In this way the automatic advertising does not start if a Voice Over is playing, thus delaying its transmission. Alternatively, you can place the advertising clusters in the same schedule together with the Voice-Overs, thus avoiding the automatic playout of the advertisement.The main drawback of this Voice-Over type is that, if it is very long, the Voice-Over itself covers a good part of the first track. To avoid this, you can use the Voice-Over Type 1VOICE-OVER TYPE 1 – WITH BASE OR SILENCE BASE


If the INTRO of the second track is 0, the Voice-Over is played completely on the base


ATTENTION: if the Voice-Over is between two tracks and the AUTOMATIC ADVERTISING is ready at the end of the first track, the advertising will play and the Voice-Over will start at the end of the cluster. You can place the advertising clusters in the schedule together with the Voice-Overs, thus avoiding the automatic playout of the advertisement.Voice-over BasesIf you create your schedules with DjPro’s Schedule Manager, you must specify, in the Schedule Manager Setup, Settings 1, a list of bases that you want to use for the Voice-Overs, choosing them from the Bases category. The generated list will be available in a drop-down menu when you will insert a type 1 Voice-Over into the schedule.If you create your schedules with Digiware, all the items of the Bases category will be available in a drop-down menu when you will insert a type 1 Voice-Over.The base that you choose for a Voice-Over in a schedule must be longer than the necessary duration, as the base will not play on a loop.If the base is not specified, or points to a non-existent file, ON-AIR does not play the Voice-Over properly.VOICE-OVER TYPE 2 – ALWAYS BETWEEN TWO SONGS

VOICE-OVER TYPE 3 – VOICE TRACKThe Voice Tracks are Voice-Overs whose start point and end point are defined by the user in the scheduling process with the DjMTrackutility, or during their recording with a “Voice Track OnAir” (see DjPro User Guide).If you schedule a Voice Track whose start point and end point have not been set, it will be played by OnAir as a Voice-Over type 1, that is, all or part of the Voice Track will play on the base that you have chosen in the scheduling process.SCHEDULING A VOICE-OVERThe parameters explained on the first section, once they are set, are valid for all the Voice-Overs that you will schedule and play on the air.If you do not enable the parameter called Voice-over type from DBF, all the scheduled Voice-Overs will be of the type that is set into the parameter called Voice-over type; otherwise, in Schedule Manager you can set, for each Voice-Over, a different type and, in the case of Voice-Over type 1 and 3, a different base.The mask for the schedule of a Voice-Over looks like the following picture:
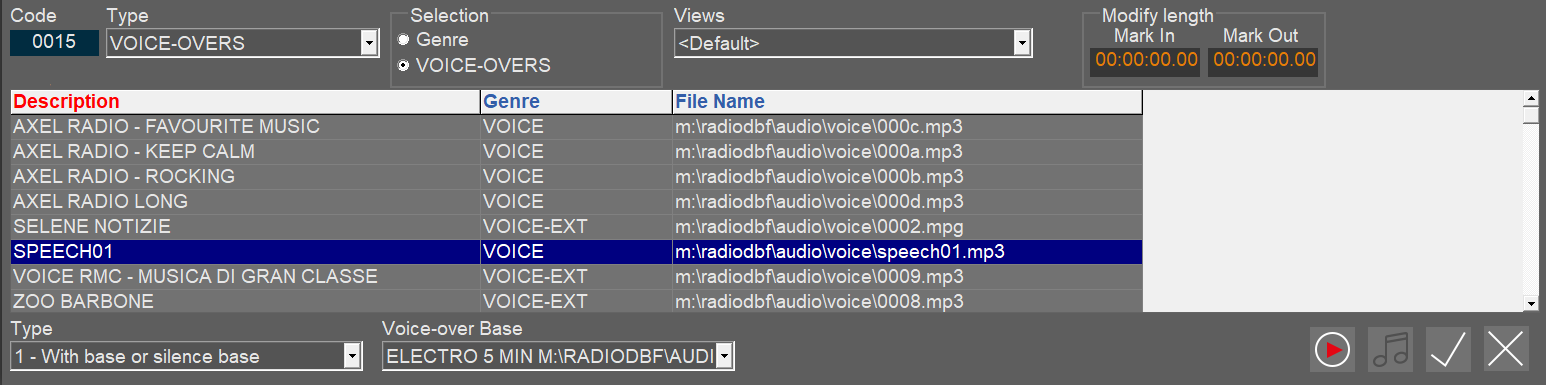
The user can select the Voice-Over type from the Type menu and, eventually, associate a base from the Voice-over Base menu.The list of the available bases for the Voice-Overs must be specified first in the Schedule Manager Setup, Settings 1.
Setting the audio devices with DjPro ClientWhen you install a DJPRO Client on a new workstation, the installer automatically detects all the audio outputs and inputs, which are set in you Windows system, and save them into a local configuration file.In order to manage the detected devices, you can open Windows Start Menu, DjPro (Classic or Enterprise), and click on DjPro Audiocard Config which will open the Audio card settings panel showing a list of all the available outputs and inputs
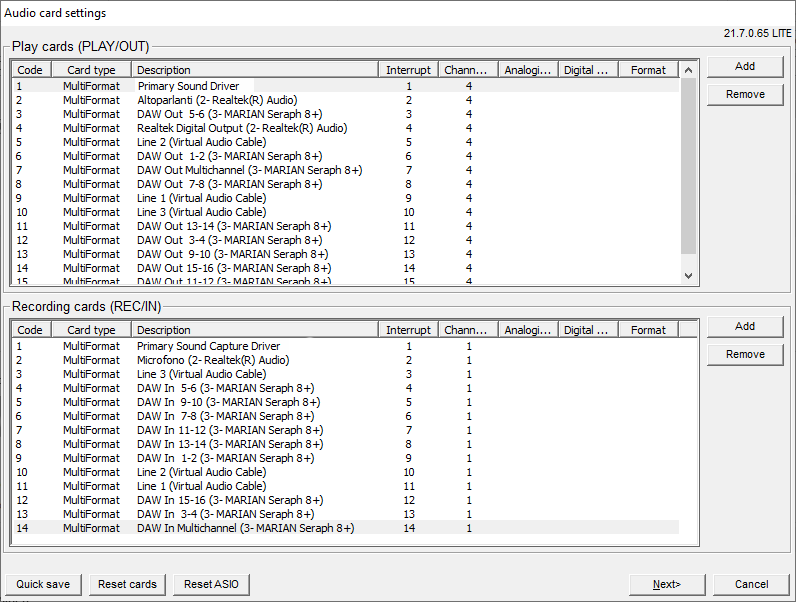
The “Primary Sound Driver” and “Primary Sound Capture Driver” voices are the default output and input set in Windows audio panel, while the rest of the list are the actual devices (physical or virtual) that are installed on the workstation.The first thing to do is clean the list from all the devices that you do not want to use in DjPro (you can add them again in a second time by using the Add button) and put the remaining items into an order:
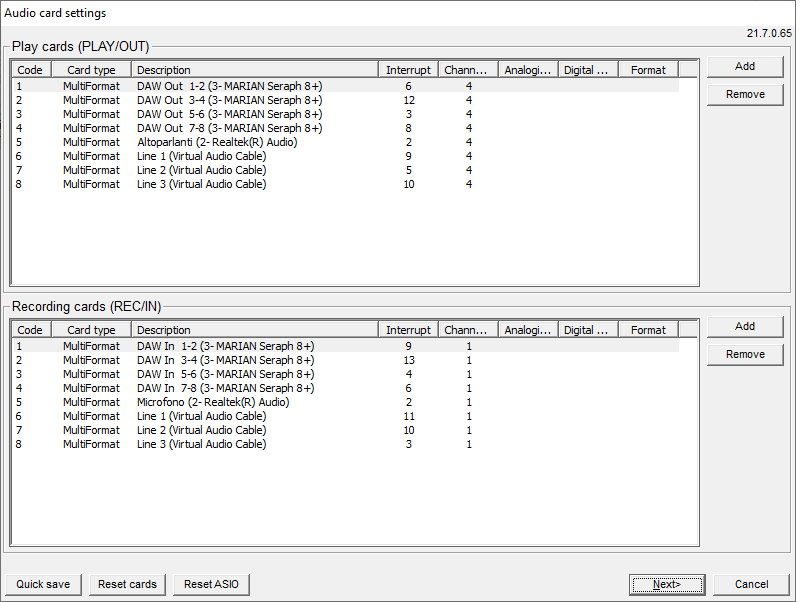
Click on Next> to open the next page where you can set which output and input you want to use for DjPro’s Recorder and DjPlayer:
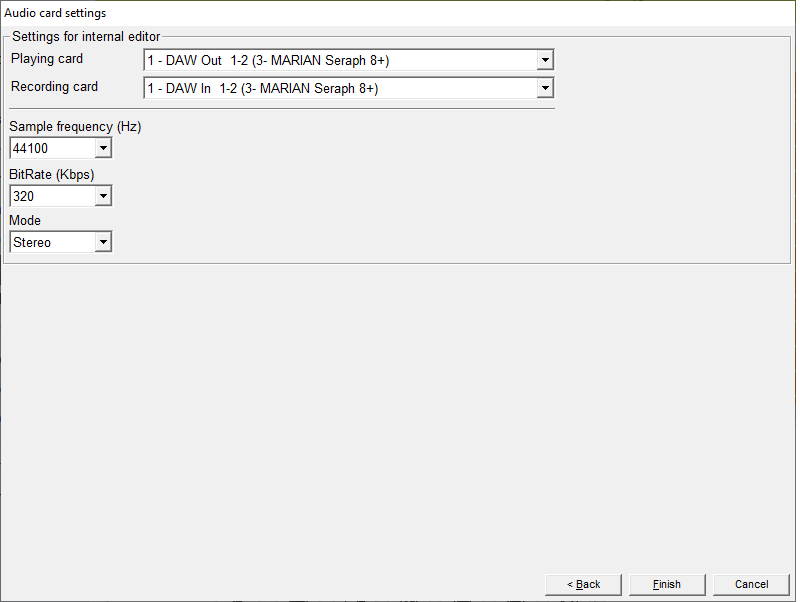
On this page, you also decide what audio format to use for the files that you will import or record when you work in DjPro from the current workstation.Click on Finish to save the settings, and confirm all the request messages that will appear.Setting the audio devices for the OnAir playoutOnce you have configured the audio devices for the workstations of DjPro system, then you can configure the devices to be used for the OnAir playout.To do so, open DjPro from the OnAir workstation, go to Setup ON-AIR Manager and open the OnAir configuration, then select Audio Cards configuration Sounds card setup
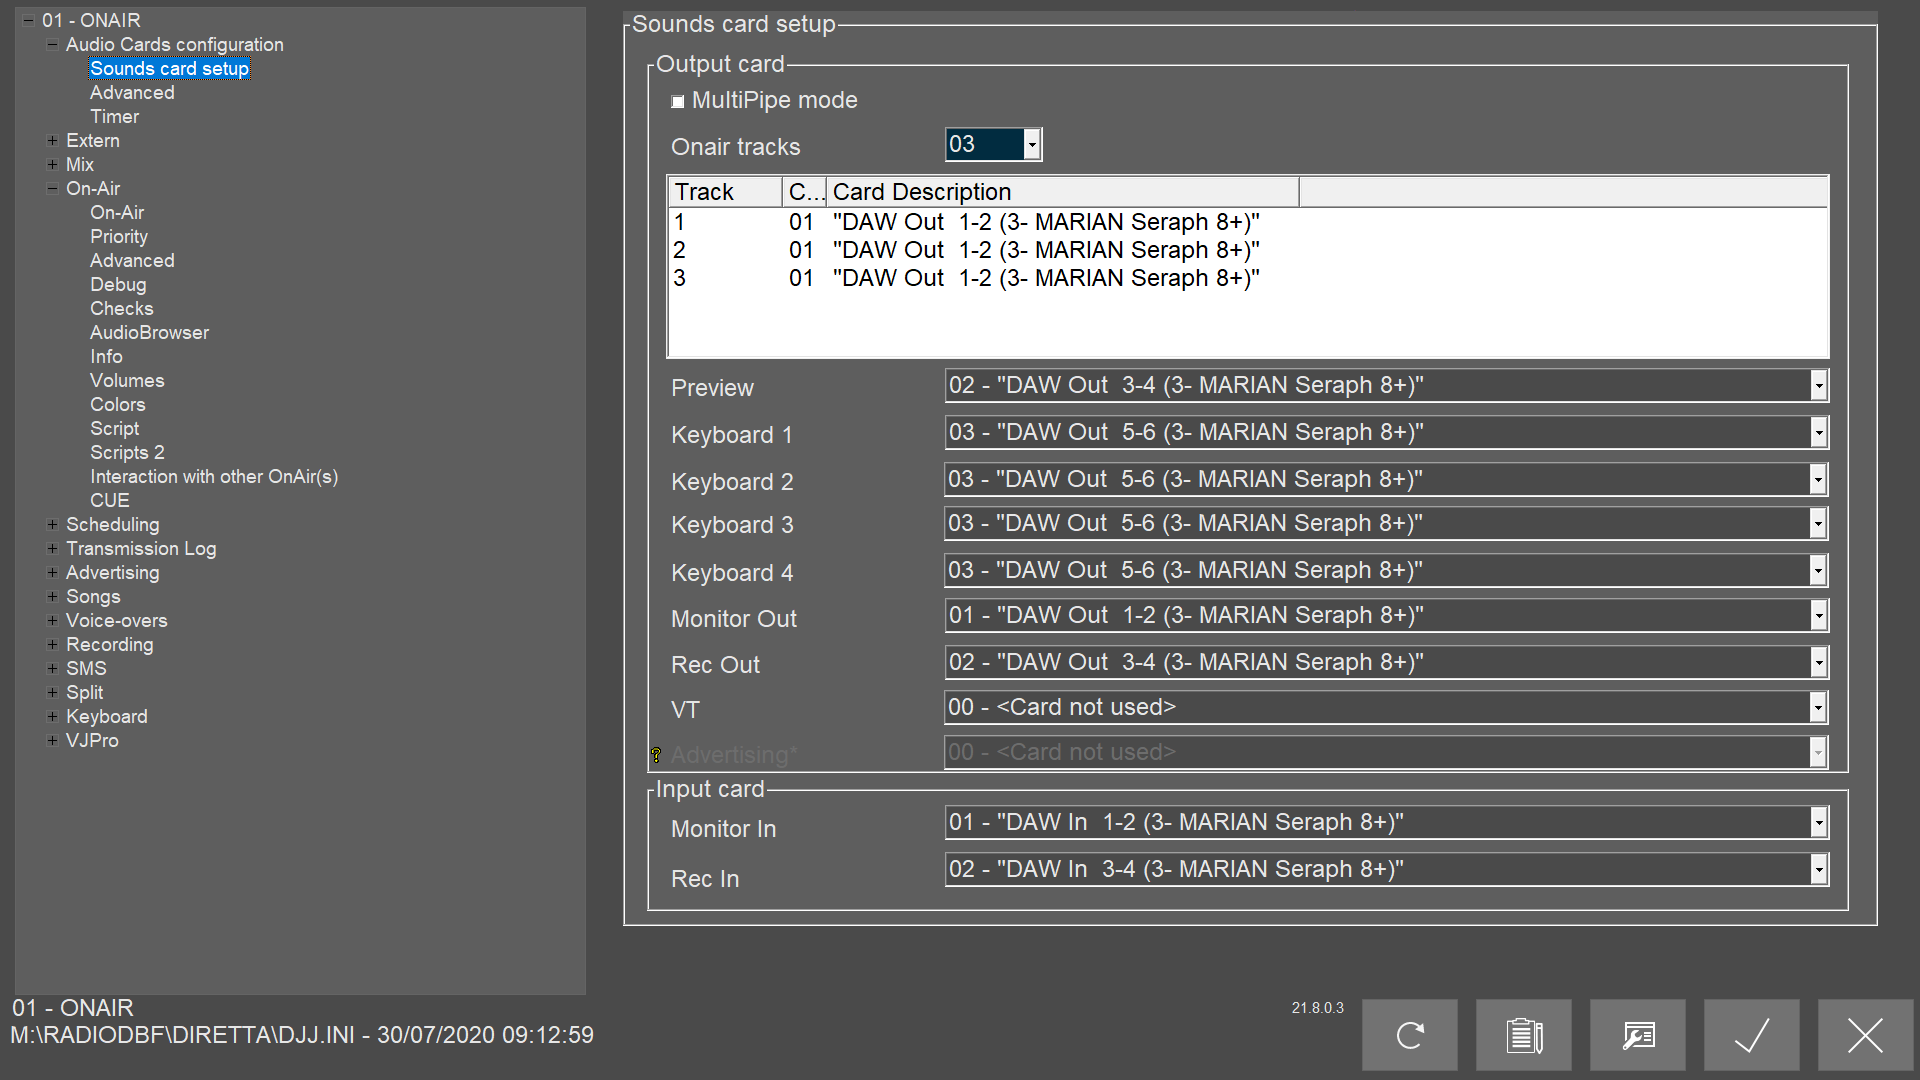
According to the list of devices that you have set in the local Audio card configuration (see previous chapter), here you can choose the outputs for the playout (Onair tracks), for the CUE panel (Preview), for the Hot Keys (Keyboard 1,2,3,4), for the pass-through audio (Monitor Out) and for the REC panel (Rec Out)In the same way, you can choose the input which will receive the audio feed for the pass-through audio (Monitor In) and the input for the REC panel (Rec In)PLAYOUT MODEIn the OnAir audio setup, you can configure one or more outputs for the main playout.One output (default): set Onair tracks to 03 and, in the box below, set three times the output that you want to use for the playout. With this configuration you will have one output for the main playout, which can play up to three audio streams at the same time (e.g.: the end of a song overlapped to the begin of the next audio, and a voice-over playing over them)Two or more outputs: Set OnAir tracks to the number of outputs you want to use (e.g.: 03) and, in the box below, set the list of outputs you want to use. With this configuration, the playout will play each item with a different output, according to the list of outputs set.Each output that you will set into the list will be associated to a letter (the first output is associated to A, the second output is associated to B,…) so that, in the OnAir window, you will see the related letter next to first items into the playlist. For example, if you have set three outputs, the item on the air and the next two items in the playlist will have the A, B or C letters associated to them.This mode is useful if you want to manage the playout using more than one fader from your mixing console, in order to adjust the audio level for each item that is going to play.
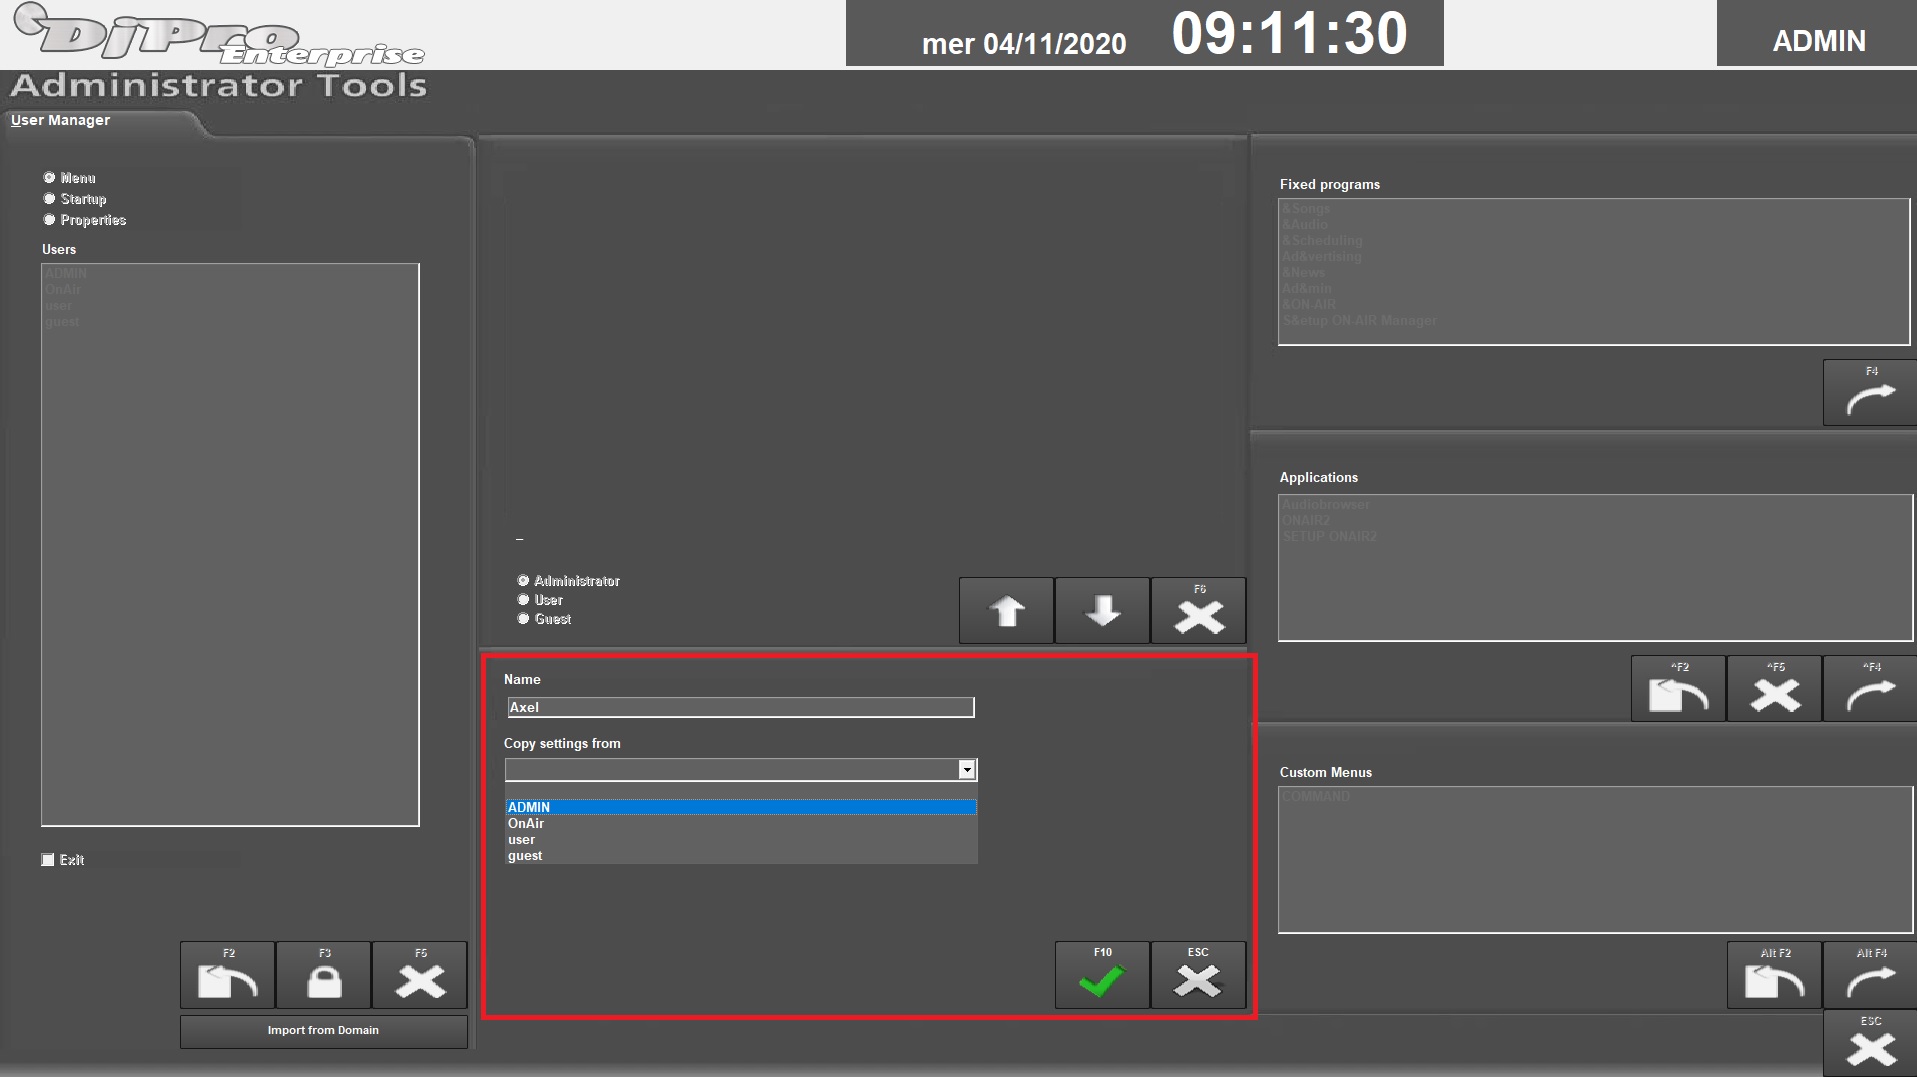
Go to ADMINISTRATOR TOOLS –-> User manager.To create a new user press F2.Assign a name to the user and if you want you can copy settings from another user, then press F10
Select one by one the items of the main menu and choose if this user must be:
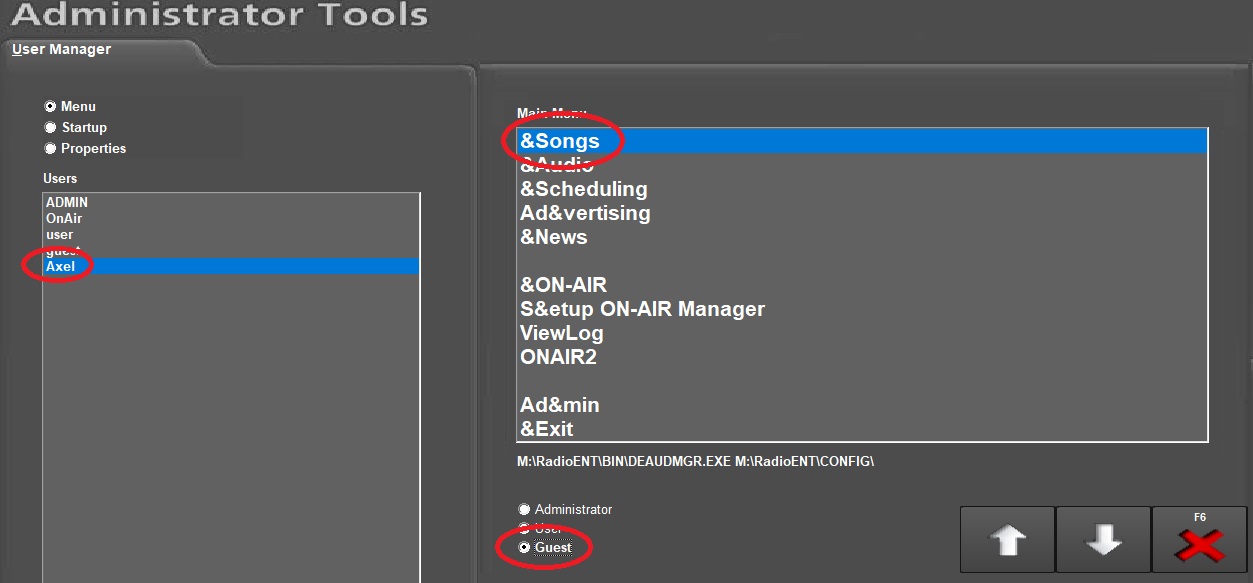
If you want the user to be guest of anything, you must select the main menu items one by one and set them as guest.NOTE: a user GUEST can’t modify other users, so be sure to have at least one ADMINISTRATOR user.
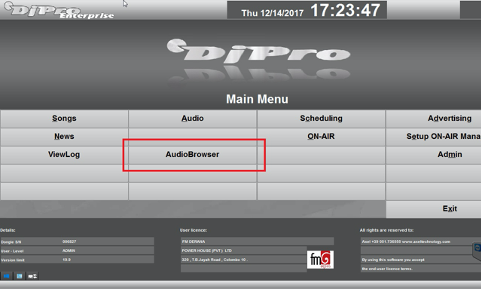
Login on DjPro menu with the ADMIN user and click on AudioBrowser.
It will open AudioBrowser and ask to insert user and password

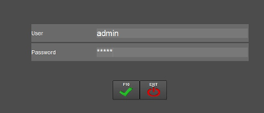
Insert ADMIN user and its password then press F10. It will show the main page of the AudioBrowser. Click on the SETTINGS button on the right
It will open the SETTINGS panel
Click on USERS
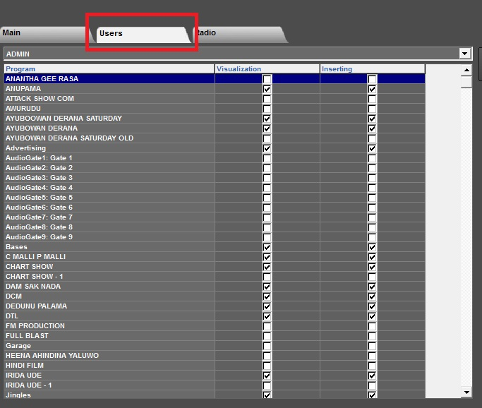
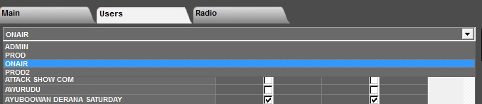
Then choose the USER ONAIR from the drop down menu
Now you can enable the audio categories one by one or, if you want to enable them all, just click on the two large buttons on the right.

Save and close.
DjPro provides a series of commands that allow automatic creation of audio files for the podcast. In practice, by inserting certain commands in the playlist, it is possible to record automatically the Radio broadcast.IMPORTANT: the commands we are going to explain work with the REC panel of the OnAir playout, which records only the audio feed ingested to the related input of the audio card configured in the OnAir Setup. This means:

In the same audio category, add another item for the START command: insert a description (e.g.: REC START), replace the File Name with the one that is set in the file for the podcast, by adding REG- before the path (e.g.: REG-M:\audio\program\0001.mp3) and save.

Add another item for the STOP command: insert a description (e.g.: REC STOP), replace the File Name with the one that is set in the file for the podcast, by adding FIN- before the path (e.g.: FIN-M:\audio\program\0001.mp3) and save.

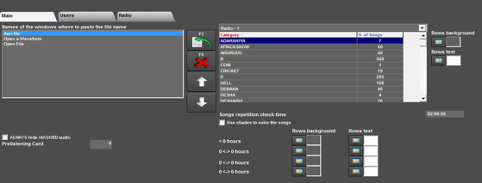
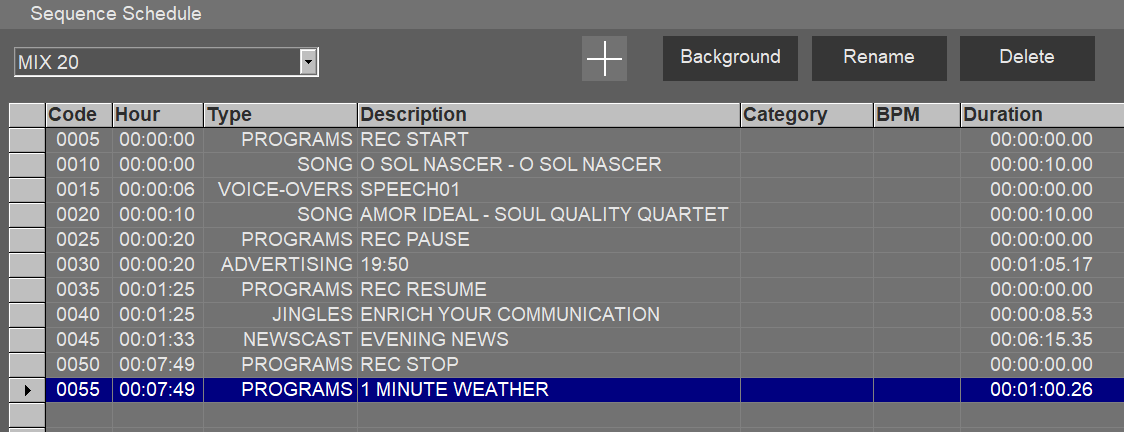
In the same way, you can add the PAUSE (PAU-) and RESUME (RES-) commands.Once the commands are ready, you can insert them directly into the OnAir playlist like any other audio item, and the program will execute them by following the sequence, thus recording with the REC panel into the audio file specified in these commands.If you want to schedule the commands, you can use them in Events, Days, or Sequence Schedule. In the example below, we inserted the commands into a sequence in the Sequence Schedule:
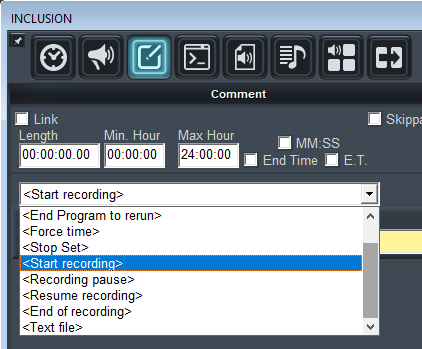
DIGIWAREIf you use Digiware, the schedule of these commands is very easy. Of course, you can schedule the commands that you previously prepared in DjPro, as explained in the previous chapter, but there is another procedure, which allows to manage them directly from Digiware.Open the clock (or the scheduled day) where you want to schedule the commands and select the “Comment” section in the window on the right

In the drop-down menu, you will find <Start recording>, <Recording pause>, <Resume recording> and <End of recording>.Select <Start recording>
It is now possible to act in three different ways:
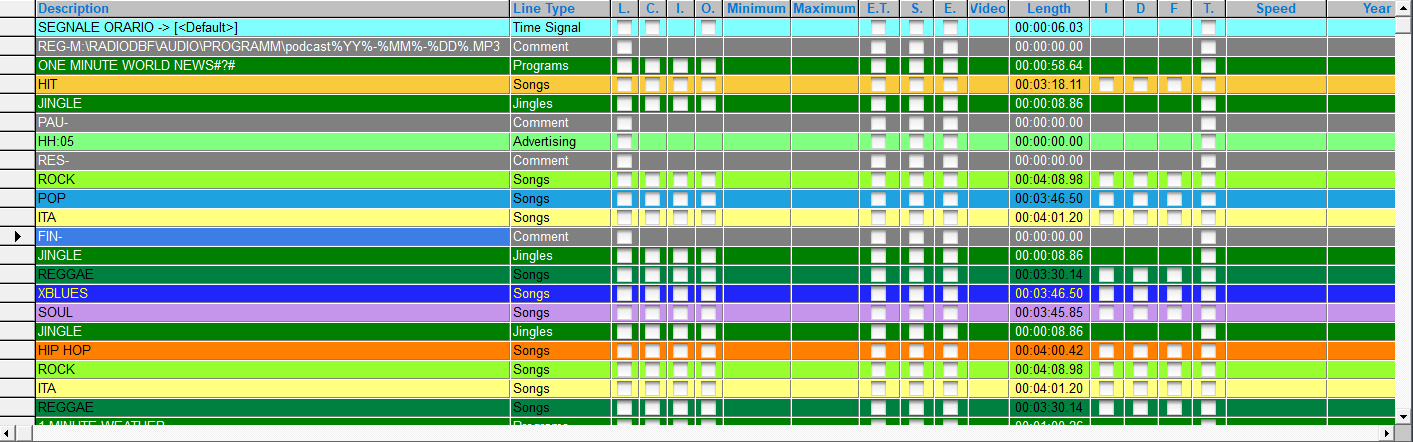
If, for example, you schedule and play this sequence on December 15th, 2020, the generated file will be M:\RADIODBF\AUDIO\PROGRAMM\podcast20-12-15.MP3